This is post is applicable to the old CNC Router that we sold in 2022. It is not applicable to the new CNC Router.
The Basic Workflow:
1. Idea
2. Fusion360
3. Transfer File (USB or on the Network)
4. Shop Rules
5. Mach 4
6. Run the AA Router
Fusion 360
1. Where to go for help http://help.autodesk.com/view/fusion360/ENU/
2. Data Management / Cloud
3. Setup (units, etc…)
4. Workflow
1. Model
1. Sketch
2. Extrude
2. Machine
1. Setup
2. Cuts – Take successive passes of material away
1. General guidelines
1. Each pass depth less than the diameter of the bit
2. Feed rate ~ 100 inches per minute
3. Inside Corner adjustment – “Feed Optimization” setting
2. Types of Passes
1. 2D Adaptive Clearing
2. 2D Pocket
3. Face
4. 2D Contour
5. Slot
6. Thread
7. Trace
8. Bore
9. Circular
10. Engrave
11. 2D Chamfer
3. Simulate
4. Postprocess
Bits, Feeds and Speeds
- End Mills & Drill Bits
End mills can cut sideways and usually down; drill bits just cut down
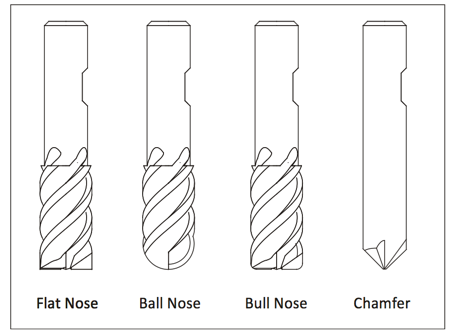
2. End Mill Types
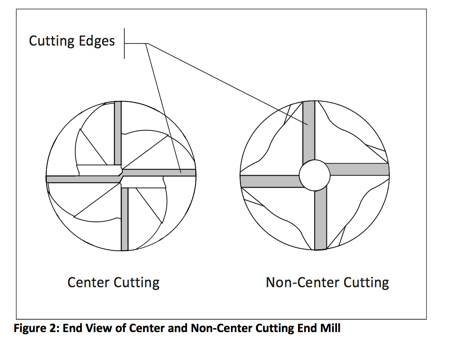
3. Center cut versus non-center cut
(non-center cut must ramp, center cut can plunge like a drill bit)
4. Types of passes
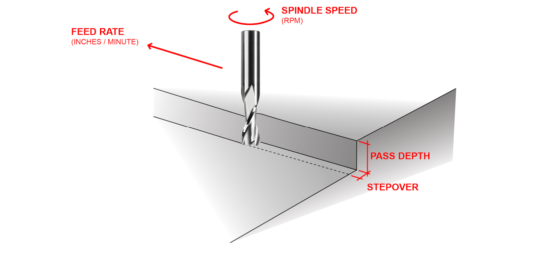
5. StepOver and StepDown
1. Max stepdown = diameter of bit, better is 1/2 diameter
6. Bit Material
1. HSS (Good, $): High speed steel: Cheap, dulls quickly
2. Carbide Tipped (Better, $$): lasts longer (5-20X), more expensive
3. Solid Carbide (Best, $$$): lasts longest, most expensive and can be brittle
7. Number of Flutes
1. 1 flute: good for wood, unusual
2. 2 flutes: typical for wood
3. More than 2 flutes – OK, but prone to heating on our machine as it moves slowly
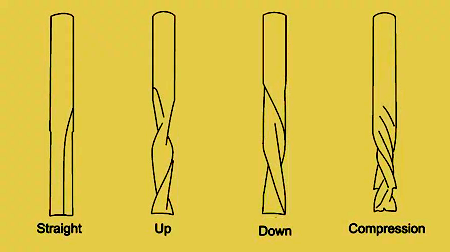
8. Bit Direction
1. Straight –
2. Upcut – good for speed, may cause thin or flexible materials to lift up.
3. Downcut – good for plywood and splintery woods
4. Compression – good for production usage, not appropriate here
Spindle Speed – rotational speed of the cutting tool in revolutions per min
Feed Rate – Surface speed at the center of the rotating tool
The default mill settings in the Fusion360 library under Samples, Inch-Aluminum, or Metric-Aluminum will give a good conservative starting point. Always watch and listen to the router for signs it is working too hard and use the manual override in Mach 4 if needed.
Which End Mill should I buy?
http://www.shars.com
http://www.harveytool.com/
https://www.ebay.com/usr/drillman1
Common mill types for general use:
1/8″ square upcut, 2-4 flutes
1/2″ square upcut, 2-4 flutes
1/4″ ball nose upcut, 2-4 flutes
1/4″ – 1/2″ chamfer bit, 2 – 4 flutes
Shop
1. Safety
1. Personal
1. Closed toe shoes, tight clothing, short sleeves, long pants
2. Hair – pulled back
3. No gloves
4. Jewelry – no rings or watches
5. Eye protection mandatory; ear recommended.
2. Securing the material
-
-
-
-
- Two sided tape – not a great solution
- Screws – requires caution
- Plastic nails and nail gun – quite nice
-
-
-
3. Process
1. Always be in room
2. Fire
3. Cleaning
1. If it is a mess when you found it, either clean it or don’t use the system.
2. Drill bits removed, wrenches back in closet
3. Sweep board, sweep floor, vacuum up as possible
4. Close Mach 4 and log off computer
5. Remove any wood scraps from the site (Pack it out!)
Transfer Files via GCode
AMT Wiki page on exporting GCode from Fusion 360 to Mach4
https://wiki.acemonstertoys.org/export-gcode-from-fusion360-to-cnc/
Hands On
1. Walkthrough the interface
2. Homing & Hard limits vs softlimits
3. Home all Ref
4. Feed Override
5. Diagram
6. Estop vs powerswitch
ALWAYS be present and WATCH for potential fires and problems
We have a nailgun for attaching stock to the spoil board. Instructions for use are at
https://wiki.acemonstertoys.org/cnc-plastic-nail-gun/
If there are any questions about anything post a question to our slack channel (cnc-router). Feel free to ask about anything you are not sure of or for more help in using the CNC or prepping for use of the CNC. You can also post pictures of work you’ve done as we like looking at pics.
CNC startup list
Start up and shut down check list as of May 2021:
Check clothing, jewelry and eyes (no long sleeves, no dangly stuff and wear eye protection) Ear protection is recommended.
Check Trash can connected to the Cyclone. Is the can > 1/2 full? (empty or post on Slack and don’t use)
Check router area – Is table clean and gantry area clear.
Turn on the computer and monitor (make sure there is no USB drive inserted until after the computer has started up)
When offered the choice of user, choose the one on the right. (AMT CNC USER)
Any Microsoft warnings that come up can be dismissed by choosing the “later” option.
Turn on the light switch in the box on the orange cord. This turns on the stepper motors. These must be on before launching Mach4.
Launch Mach4 from the desktop icon.
Choose the setting AAROUTER, it should be the top one.
Activate the gantry movement by clicking the Enable button on the screen (or the blue button on the X Box controller)
Test the gantry is active and working properly by moving it up an inch or two. (right joystick forward)
Click “Reference All Axes (Home)” and allow to finish.
Attach your work piece to the spoil board with one of the approved methods. (brass screws, plastic nails)
Install the mill you want to use.
Set the X, Y, and Z zeroes to match those in your G Code. Take care to not use a setting that will cut into the spoil board. You should never cut into the spoil board intentionally.
Check the router speed is set correctly.
Check that the flue is open for the dust collection. Turn on the Cyclone.
Start the router and run the G Code.
—————————————————————
Once finished reverse the above plus:
Remove all wood scraps, remnants, and fasteners (screws, etc…)
Return bits, collets, wrenches and screws to cabinet
Sweep or shop vac router table, gears, and area around table. Look for dust.
Panic Sequence: (this only applies to the CNC with the Porter Cable Router and will not apply to any ShopBot)
If something goes horribly wrong like a “z dive” the best course of action using the xbox controller is.
1. Hit the red button. This stops all movement and disables the control of the stepper motors.
2. Hit the blue button. This returns control of the stepper motors.
3. Move the right joystick forward. This moves the router up and out of any wood it may be rubbing against.
4. Turn off the router.
Hello,
I really want to get certified on the CNC router as soon as I can. Do you know when the next certification class will be? I would love to get a date and sign up for it so I can begin my project.
Hello Mark,
We are a small organization, and like many small businesses have been hit hard by COVID. The best way to know when classes post is to keep an eye on https://www.meetup.com/Ace-Makerspace/events/calendar/