 Loading asset information.
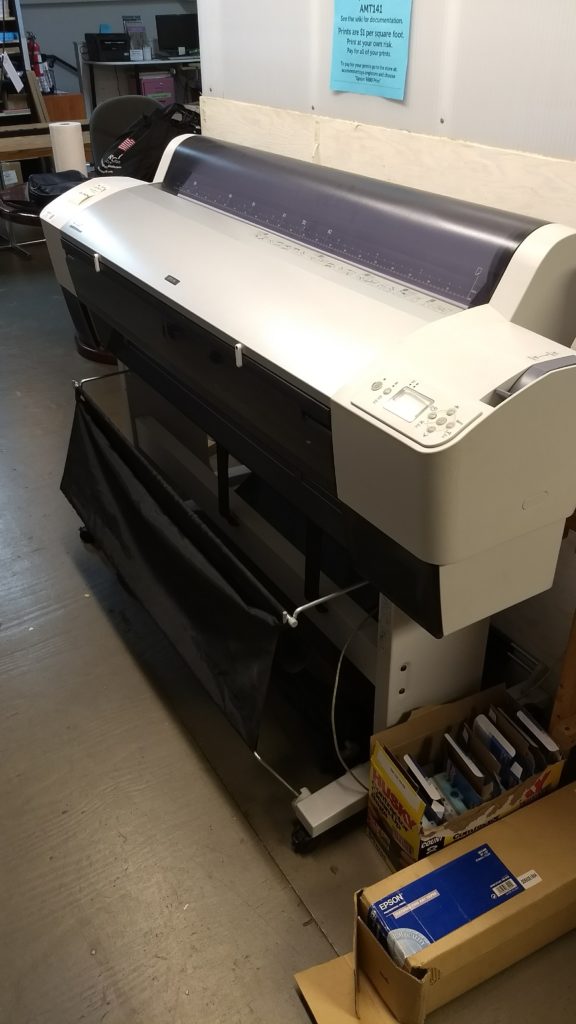
This page needs a refresh from describing retired asset Epson 9880 to describing new to Ace printer SureColor P9000.
Steward: Open
Downloading the drivers
1. Go to this website: https://www.epson.eu/support/?productID=2542&language=en#product_search
2. In the dropdown menu titled “Filter content by the operating system”, choose the operating system you are running on your computer of choice
3. Download the most recent “Driver” from the accompanying list that corresponds with your operating system.
Installing the drivers
- Open the downloaded file and follow the instructions
- Turn on the printer
- Plug the printer’s USB cord into your computer, and the driver will automatically download
Setting up Catch Cloth
- The large format printer has a catch cloth underneath to prevent prints from falling on the floor. It has two positions it can be set in, one for prints shorter than 40″ and on for prints that are longer than 40″ (1030mm).
- For short prints, the two silver metal hooks should be pulled all the way out, the black plastic guides that hang down from the printer should be angled straight down (pinch the sides to change the angle of these, but be very gentle as they break easily!) and the two elastic loops one the side edges towards the front of the cloth should be hooked over the silver hooks. In this mode, the prints will be directed under the printer and caught by the cloth.
- For prints longer than 40″ (1030mm) the elastic loops should be unhooked so that the front section of the catch cloth hangs down, the silver hooks on the sides should be pushed all the way back towards the printer, and the black guides should be in front of the horizontal bar supporting the cloth to direct the paper down the front of the cloth. In this mode, the print will slide down the front of the cloth and onto the floor, so pay attention and catch it if you don’t want it to get dirty!
NOTE: To switch the cloth position you have to remove the horizontal support bar from the silver hooks to get it under the black plastic guides, then you can replace it once the hooks have been slid in or out.
Printing
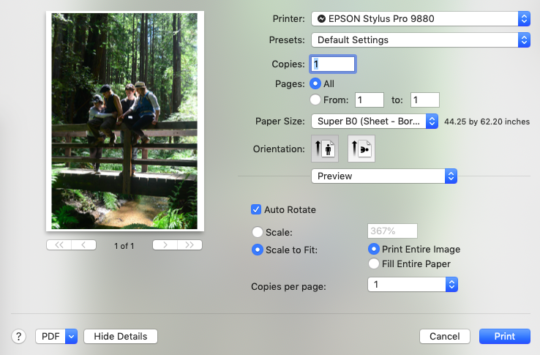
1. In your print settings, be sure to set your paper size accordingly. As of 9/19/2017, the width of the paper roll was 44in, which corresponds with the Paper size “Super B0”. If it looks like the roll in the printer is less than the entire width of the printer, check and choose a new size accordingly. In the event that AMT stocks multiple paper sizes, these instructions should be updated to reflect a new procedure.
How to check paper size: https://files.support.epson.com/docid/cpd5/cpd51065/source/pro_graphics/source/specifications/reference/scp10000_20000/spex_paper_pro_graphics_scp10000_20000.html
Make sure there is enough paper left on the roll for what you want to print (just estimate).
-
- In Adobe Illustrator Set up a custom size based on the paper loaded and the size of your art.
-
- In Preview on Mac, you can select the paper type and print as if you were using a normal printer. Note that any white space left on the page will print as well, which you still need to pay for, so it is recommended to orient your picture to print using the entire roll width. Note that preview displays the final print size/paper used (44.25″ x 62.20″).
-
-
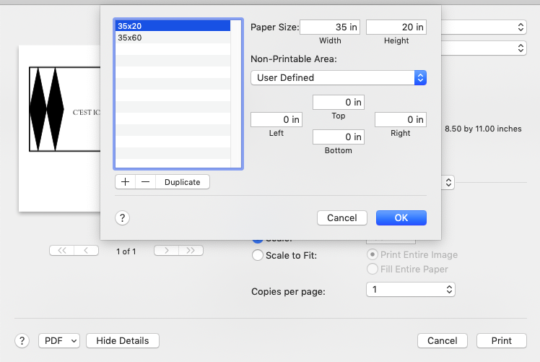
- To change the paper dimensions, go into Paper Size > Manage custom sizes… on Preview.
-
-
-
- Calculate the size of your final print and add a new custom paper size. Now you can print edge-to-edge with no wasted paper.
-
2. Once you’ve oriented your print correctly (landscape or portrait) and you are ready to print, go ahead and press print on your computer.
3. If prompted to clean nozzle heads, the left arrow will decline and will allow you to print right away.
4. The printer will automatically cut paper to size after print and hold it there until the user pulls the paper out of printer.
ONLY PAPER SPECIFIED BY THE MANUFACTURER (EPSON) AS OKAY FOR THIS MODEL PRINTER IS ALLOWED.
Payment
- The large format printer is free to print materials for use in-house. Everything else is charged via the honor system at $2.00/ft^2 (of ”’paper”’, not print).
- You can pay on the main wiki page under shop: https://www.acemakerspace.org/product/epson-9880-print/
Changing Paper
ONLY PAPER SPECIFIED BY THE MANUFACTURER (EPSON) AS OKAY FOR THIS MODEL PRINTER IS ALLOWED.
Usual paper on the printer: EPSON Doubleweight Matte Paper 44″ x 82.0″ (S041387)
- If there is an extra paper of approved type, follow the instructions on the printer to replace the paper.
- If there is no extra paper, and you have used up the last of the roll, please notify the #large-format-printer channel on slack. Then please put in a purchase request for paper:
https://www.lexjet.com/double-weight-matte-paper-44in-x-82ft
https://www.amazon.com/EPSON-S041387-Photo-Paper-Brightness/dp/B00Q8N905Y
Purchase request: https://wiki.acemakerspace.org/purchasing/
Changing Ink
If you’re getting odd color reproduction, one of the cartridges may have run out of ink. The printer won’t report the status of any non-Epson cartridges, like the cheaper refills we use, so you should take a look at the ink lines inside the front of the printer to see if any have air bubbles in them (which is a sure sign of them running dry). Another way to test the ink levels is to physically remove the cartridges and feel the weight of them in relation to other cartridges to tell which ones are empty (see instructions below for how to remove ink cartridges).
The ink lines are labeled with which ink slot they pull from – for example, the Light Magenta line is labeled “L2” as it’s the #2 slot on the left-hand side.
If you know you need to change ink, the procedure is as follows:
- Make sure the printer is turned on. If you change the ink with it off it will be unhappy.
- Pop open the ink compartment (they’re on the bottom-left and bottom-right of the front of the machine, and push in to pop open)
- Raise the locking lever in the compartment to unlock the cartridges.
- Gently pull out the cartridge that needs replacing, and put it in the box of empty cartridges next to the machine. Make sure you don’t let any remaining ink leak out of the back.
- Gently shake the new cartridge a few times and then push it into the slot
- Lower the locking lever and close the compartment
NOTE: Sometimes when the printer is out of ink in one or more of the cartridges, it will spit out unrelated errors such as paper loading, etc.
The printer will do a small cleaning cycle once it detects the change and then be ready for printing. You may need to flush the ink line a bit to get the new ink to the print head; you can do one of two things:
- Print a color purge file from https://www.marruttusa.com/printer-maintenance/inkjet-printer-purge-files.php for the cartridge you changed (preferred, also can be used to verify it’s broken)
- Run the Power Cleaning mode (Menu > Maintenance > Power Cleaning). Be warned this takes about 10 minutes and uses a decent bit of ink, and will need you to manually raise and lower the locking levers in the ink compartments when the printer prompts you.
If we are out of ink, please put in a purchase request for ink. Ink types:
- PHOTO BLACK: https://www.inkowl.com/wide-format/wide-format-cartridges/epson/220ml-compatible-cartridge-for-epson-stylus-pro-7880-9880-photo-black-t6031/P5072/
- CYAN: https://www.inkowl.com/wide-format/wide-format-cartridges/epson/220ml-compatible-cartridge-for-epson-stylus-pro-7880-9880-cyan-t6032/P5073/
- YELLOW: https://www.inkowl.com/wide-format/wide-format-cartridges/epson/220ml-compatible-cartridge-for-epson-stylus-pro-7880-9880-yellow-t6034/P5074/
- LIGHT CYAN: https://www.inkowl.com/wide-format/wide-format-cartridges/epson/220ml-compatible-cartridge-for-epson-stylus-pro-7880-9880-light-cyan-t6035/P5075/
- LIGHT BLACK: https://www.inkowl.com/wide-format/wide-format-cartridges/epson/220ml-compatible-cartridge-for-epson-stylus-pro-7880-9880-light-black-t6037/P5076/
- LIGHT LIGHT BLACK: https://www.inkowl.com/wide-format/wide-format-cartridges/epson/220ml-compatible-cartridge-for-epson-stylus-pro-7880-9880-light-light-black-t6039/P5077/
- MAGENTA: https://www.inkowl.com/wide-format/wide-format-cartridges/epson/220ml-compatible-cartridge-for-epson-stylus-pro-7880-9880-vivid-magenta-t6033/P5078/
- LIGHT MAGENTA: https://www.inkowl.com/wide-format/wide-format-cartridges/epson/220ml-compatible-cartridge-for-epson-stylus-pro-7880-9880-vivid-light-magenta-t6036/P5079/
Maintenance tank replacement: https://www.inkowl.com/wide-format/maintenance-tanks/epson/compatible-maintenance-tank-for-epson-4000-4800-4880-7600-7800-7880-9600-9800-9880/P7181/
Purchase request: https://wiki.acemakerspace.org/purchasing/
For more in-depth info, try the manual: https://files.support.epson.com/pdf/pro7880/pro7880gd.pdf
Maintenance Cleaning
Requires a flush kit: https://shop.inkjetmall.com/PiezoFlush