 Loading asset information.
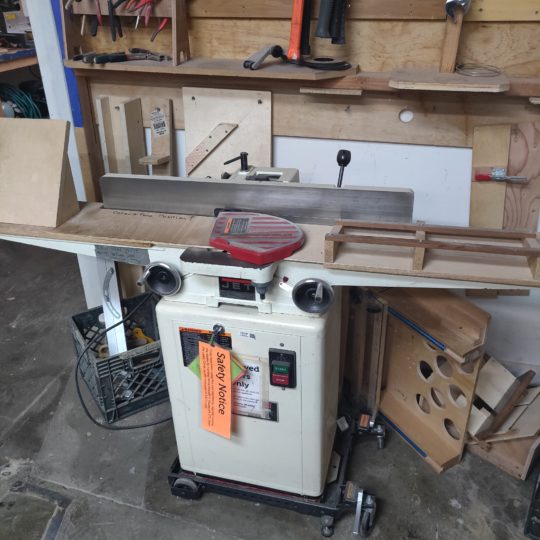
Model# JJ-6CSDX
Documentation: Manual
Jointer Basic Rules
- Don’t use short stock on the jointer
- Don’t run the short edge of stock (i.e. then end) on the jointer
- Make the stock as flat as practical before using the jointer
- Use the jointer to make one face and one edge flat; use a planer to make the other face flat and parallel to the first; use a table saw to make the other edge flat and parallel to the first
- Push down on the stock with push sticks throughout the cut, pressing it down on both sides of the cutting head and shuffling your sticks as you “walk” the stock across the head
- Feed the stock with your other hand and switch to a push stick, but never put your hand on top of the stock while it is on the table; pull from the output side if that is possible
- Return the fence to vertical after use if you adjust it away from vertical
Tips
- Make multiple passes that remove less wood for a smoother surface
- Make a custom push stick for the shape of the stock you will be feeding if it is unusual, or if you are cutting a bevel
- Use a table saw instead of a jointer for edges, if that is practical
- Unless you are manufacturing your own stock, you may never need a jointer. Never needing a jointer isn’t a sign that you are doing anything wrong
AMT Certification Course
This is a summary of what is taught in the AMT certification course for the ”’Jointer”’.
What Does a Jointer Do?
This tool can reduce the thickness or width of wood and leave a furniture-quality edge or face behind. But you cannot reduce the length of a board by running it through the jointer on its narrow edge — there is no safe way to do that.
A jointer relies on the difference in height between the infeed table in front of the cutting blade and the outfeed table behind it. The cutting blade and the outfeed table are at the same height. The wood is fed to the cutter on the input table and gets cut down to exactly meet the outfeed table. The cutting head makes the stock wonderfully smooth.
A jointer is used before a planer. First you use a jointer to create one smooth face on a board. Then you run that smooth side face-down through the planer to cut the board to a consistent thickness, making both faces smooth and parallel to each other. Use a band saw to create rough planks, then run them through the jointer and planer to produce furniture-quality stock.
Jointer Adjustments
You can adjust how much wood is removed by lowering the infeed table. Adjust the amount of wood removed by loosening the black knob under the infeed table and then rotating the chrome adjustment wheel. Once the thickness is set, tighten the black knob to lock the table in place.
Do not attempt to take off too much wood in one pass. You will probably need to make multiple passes to remove enough wood for your needs. Smaller passes also result in smoother faces and edges than larger passes where more wood is removed. You do not need to adjust the jointer for each pass; however, it is common to take a very thin final pass to get the smoothest face.
There is an integrated fence which allows you to both guide your work and set a beveled angle. It can be inclined by up to 45 degrees for smooth beveled edges; however, a table saw can also easily do this.
Jointer Accessories
You may need an input support (extension) table to support long stock as it is fed into the jointer and another to support the stock after it leaves the jointer. The stock should be stable, and you should not have to support it as you push the work through the jointer.
You will also need at least one push stick.
Common Techniques
A jointer does only a few things, but nothing else in the workshop can do them.
Making a Flat Face
To begin with, your stock should be reasonably flat. It might have been resawn on a band saw from a larger beam or even a tree. It should be free of any metal (use the metal detector), and if it is wildly uneven you might want to take down the worst peaks with a hand plane; this makes it safer, not quicker.
If the stock is long, arrange an input support table so that when the stock is slightly more than halfway through the jointer it will leave the support table. Arrange the output support table so that when just less than half of the stock has gone through the jointer it will begin to rest on the output support table.
If the stock is shorter than the length of the input table itself, it cannot be run safely through the jointer. It cannot be controlled to prevent kickback.
If the wood has a slight natural bow, it should bow upward so it rides into the blade with the hollow pointing down. But, before you run it through the jointer, it is worth taking the ends down somewhat using a hand plane.
If the wood has a significant bow, you might consider first resawing it on the band saw so it has an approximately flat edge.
“A significant bow in your stock is a recipe for kickback.”
Jointer kickback has more energy because the jointer head is heavier.
That means the wood can be thrown back with more velocity.
You can use your left hand to feed the wood, so long as it is not over the input table. Out between the jointer and the support table you set up is a place you can guide and pull the wood into the jointer with your hand. But when the end of the wood reaches the input table, you should switch to a push stick. If the stock isn’t very long, you might just start with a push stick.
Stand in front of the table, not in line with the stock. The stock will move from your right to your left.
The right hand always holds a push stick and pushes the stock down onto the stock as it passes over the jointer’s input table (in front of the head). It is important to keep pressure somewhere in the six inches leading up to the head. You’ll slide this push stick back repeatedly while moving the stock toward the blade, walking the work through the cutting head.
You would think that the weight of the stock would hold it firmly to the table.
However, the jointer will be vibrating enough to bounce the stock up and down.
This effect is enough to trigger kickback.
Feed the stock slowly and evenly. Do not stop feeding the wood if you can avoid it.
It is safe to simply stop and turn off the jointer without moving the stock; however, restarting where you left off has an initial risk of kickback and can result in a noticeable defect, necessitating another pass to clean it up. It is even safer to simply lift the stock off the table away from the blades.
Near the end of the operation, you can shift your right hand to the output table and press down on the first six inches past the cutting head. If you are handy, you can switch the push stick to your left hand and pull the stock away from the jointer with your right. If you prefer, you can push the stock over the blade with the push stick.
The last little 1/8″ to 1/2″ of your pass is subject to “sniping” (tear-out and gouging). This can be avoided by using a properly placed output support table (just slightly lower than the jointer’s output table), and by pressing hard in the middle of the output table when the last portion passes over the cutting head. It is common practice to simply expect to waste the last fraction of an inch of the stock and cut off the imperfect end later.
Making a Perpendicular or Beveled Edge
In addition to making the faces of stock flat, jointers can also make an edge flat, either perpendicular or beveled; however, this is usually safer and easier on a table saw.
The procedure is the same as for the face, but the face must be jointer-flat before you make the edge. Once you have such a flat face on your stock, you are ready to consider the edge.
The edge needs to be fairly straight before you pass it through the jointer, which can be done on a band saw. If the edge is already fairly straight, you can skip this step.
You’ll start by setting the angle of the fence to make a bevel, or leave it perpendicular for a normal board with perpendicular sides.
Position the stock so its leading edge is a few inches away from the cutting head, before it begins to push open the cutting head cover. The smooth face of the board should slide easily along the beginning of the fence. It might be stable without you holding the stock, but you should press it against the fence to keep it there.
Run the face of your stock along the fence of the jointer, passing the thin edge of the stock over the cutting head. The metal cover above the cutting head will swing away just enough to pass your stock, leaving the rest of the cutting head covered.
Using push sticks, maintain pressure against the fence and downward to move the stock, similarly to how a face is cut: a long slow push, moving the push sticks and your hands to control the stock without ever using bare hands over the jointer. The only difference is holding the work against the fence.
A perpendicular cut is about as hard as a bevel cut, because the pressure needed to hold the stock against the fence is the same.
Make no mistake: a perpendicular or bevel cut
is harder on a jointer than on a table saw.
Dust Collection
The dust collector must be connected near the cutting head or under the jointer. The slider should be pulled out to allow the collector to suck in dust. The dust collector should be turned on if it is not already on. Always empty the cyclone before you leave and take your sawdust home with you. What to do if a previous user left dust behind.
Jointer Safety
What can possibly go wrong with a jointer? A lot. This is arguably one of the most dangerous tools in the workshop, if not the most. The risks fall into a couple of categories:
- Kickback
- Destroying parts of your body
Jointers are also very loud. You will have to wear hearing protection as well as eye protection when you use one.
Kickback
While not as common as with a table saw, kickback can happen on a jointer. Always stand to the side of the work when working a jointer. Don’t work short stock on a jointer, ever. Your stock should be more than thrice as long as the gap between the two tables (the rotating blade head sits between the two tables). Use a push stick and keep pressing the stock down onto the table in front of the blades.
Jointer kickback has more energy because the jointer head is heavier than a table saw blade. That means the wood can be thrown with more velocity. There is never any need for you to be standing where the wood could be thrown, but someone else might be walking by while you are using the jointer. They might not know they are stepping into or standing in a dangerous place. Be sure to warn them promptly to step out of the kickback zone.
Destroying Parts of Your Body
The chief concern is that any part of you might touch the moving blades of the cutter head. And, while there is a blade guard that swings over the unused portion of the blades, it will slide away if you push it while the jointer is operating. It can’t tell the difference between hands and wood. A hand can easily push it away and fit between the work and the blades.
Standard first aid applies: stop the flow of blood. You avoid this outcome by never ever having your hands near the cutting head and only working stock that is long enough and large enough to be worked safely by you.
The reason this is one of the most dangerous tools in the shop is because everything that encounters the blade is completely disintegrated. There will be nothing to reattach.
Safety Features
The blade cover is held over the cutting head by a spring and prevents casual contact; however, pushing wood through this tool without push sticks would bring your hands perilously close to the blades, especially at the end of the cut, so it’s critical to use push sticks before your hand gets anywhere near the head.
Failsafe Hand Positioning
Failsafe hand positioning is where you put your hands so they are not injured should the unexpected occur.
Place one hand on a push stick, holding the work down on the input table in front of the moving blades during the early parts of the cut and pushing down on the output table in the latter parts of the cut. The other hand advances the stock, but never overlaps with the jointer unless it is using a push stick.
You never put your hand on the stock while it is on the jointer — you use a push stick.
http://cdn3.craftsy.com/blog/wp-content/uploads/2015/05/push-stick-collection-kt1.jpg
A few different kinds of push sticks that are easy to make
Failsafe Stock Handling
Failsafe stock handling is how you hold and move your work (aka stock) throughout the entire work process.
- Never work short stock or exceedingly thin stock
- Press stock down on the output table and against the fence with one push stick, and push the work forward with another push stick or your hands if they are not over the the jointer.
- Use support tables for longer stock, at both ends.
- When you are finished with the cut, the cover should swing over the blade. Then you may remove the stock by pulling it away from the blade and upward away from the table and fence.
- Do not attempt to take off too much in one pass.
- Never work used materials unless you have checked them thoroughly for metal (nails, screws, tacks, etc.) using the workshop’s metal detector
- Go slow — speed reduces cut quality and safety.
Always run an edge against the fence — never work freehand.
Default Configuration
When you are done with the jointer:
- Unplug the jointer and wait for it to come to a halt.
- Remove your work and use the dust collector hose remove any remaining sawdust.
- Close the dust collector inlet.
- Return the fence to vertical if you changed it for a bevel; use a square to set the angle.
Protecting the Jointer
- Keep the metal table dry and all exterior parts of the jointer dry and clean.
- Only cut wood on this tool. Cutting metal can start a fire because of the inevitable sawdust inside the tool.
- Allow the tool to come up to full speed before beginning a cut.
- Allow the tool to come to a complete halt before making any adjustment to the fence angle or cutter depth.
- Keep the blades covered at all times when not in use.
- Periodically clean sawdust that may have accumulated inside the jointer.
The most likely problem with this tool is damaging the blades. There are typically three of them, and it costs about $100 to have them sharpened. If even a tiny piece of metal touches one of the blades, it will nick the blade and from then on the jointer will leave a ridge of wood where the nick happened. This places the jointer out of commission until the blades are sharpened to remove the nick.
Terms
- Edge: If a board is 3/4″ thick, 4″ wide and 24″ long, then there are two 3/4″ x 24″ edges that could be run through the jointer. The other two edges, which are 3/4″ x 4″ (the ends), cannot safely be run through the jointer. Use a shaper or inverted router in a table instead.
- Face: If a board is 4″ wide and 24′ long, the face has 96 square inches.
- Input table: the table in front of the cutting head (part of the jointer)
- Input support table: a table or roller that supports the stock before it contacts the jointer
- Output table: the table behind the cutting head (part of the jointer)
- Output support table: a table or roller that supports the stock after it has exited the jointer
- Stock: the piece of wood to be cut (aka “work”)
Maintenance
Logs
Loading asset logs.
Monthly maintenance checklist
- Tables travel smoothly
- Tables parallel
- Dry-lube table ways
- Guard spring ok
- Inspect belt tension, alignment and condition
- Inspect cord
- Verify joint stock and inspect for ridges, excessive snipe, tearout or catching
- Knife locking bolts secure
- Wax tables, fence
- Dry-lube fence ways
- 90° stop set
- Guard tension correct
- Knives set to under 0.001″ of same height across full width of all knives
- Outfeed table set to less than 0.002″ below knives but not below 0.000 — check across whole width of all knives
- Table and fence free of burrs, especially along leading edges
- Push pads available
Consumables