Advanced Pour Painting
This page corresponds to the Ace Maker Space Advanced Pour Painting Class. There is also a Pour Painting Tips and Techniques page with details about the corresponding Ace Maker Space class.
Blending Colors
You can blend different colors to make “new” colors for your paintings. You can blend them while mixing them, or you can blend already-mixed colors.
You can mix any color you see on the color wheel if you have the right starting colors in the right ratio.
Color wheel
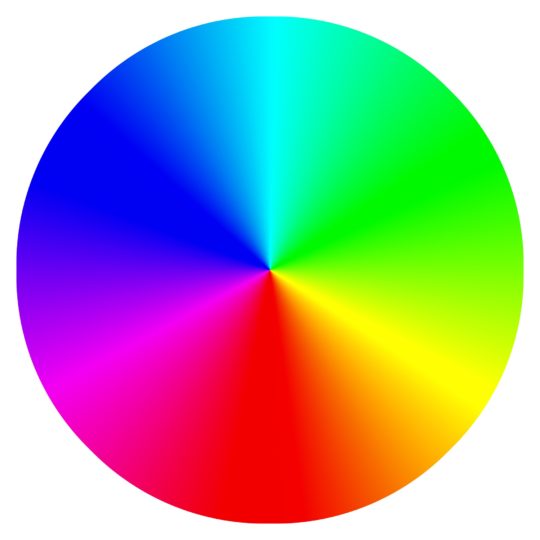
The color wheel is based on a linear progression of colors; however, that isn’t how we actually see colors. We can see many more variations in greens than we can in purples. The color wheel connects two ends of a visual spectrum: red on one end to violet on the other. It is very much like counting up to 10 and then going back to 1 and calling it a circle. Colors like pink (desaturated red) do not exist in the spectrum of light you can create with a white light split by a prism: you’d have to add white to the prism red to make pink.
Things to try:
- You can use the color wheel to help you select colors for your paintings
- You can use the color wheel to help predict the results of blending colors
More reading: https://en.wikipedia.org/wiki/Color_space
Color conflict
Take the angular difference between two color locations on the color wheel. The color conflict is the absolute value of that difference. The bigger the difference, the more conflict. Colors on opposite sides have the most conflict.
Things to try:
- Swipe a painting with a conflicting color
- Use a conflicting color for the zone lines in a filled zone painting
- Use non-conflicting colors in the zones of a painting
Blending and Saturation
Draw a line between any two colors to see the range of colors available by mixing them. Note how they always get less saturated, especially when the colors are further apart on the color wheel. The midpoint is also the least saturated color of all the colors on the line between the two selected colors.
Things to try:
- Blend some colors using a single drop of each.
- Blend a drop of a dark color with more drops of a light color.
- Pick a color on the color wheel you don’t already have and try to make it by blending colors you do have
The 10:1 Rule of Thumb
A lighter toned paint needs very little encouragement to get darker, so it is usually necessary to add 1/10th as much of a darker color to a lighter color to move the color a long way along the line that connects those two colors on the color wheel. Sometimes 1/50th part of a dark color added to one part white is enough to make a useful pastel. Yellow darkens to green with the addition of even a minute amount of blue or green. Try a very tiny amount of paint (e.g. with a toothpick or end edge of a popsicle stick) before mixing paints.
Things to try:
- Try adding a drop of various dark colors to 10 drops of primary yellow and notice how similar the results look
- Try adding a drop of a light color to 10 drops of a dark color
More reading: http://capturedchaosart.com/blog/files/mixing.html
Palette Knife Techniques
There are a wide variety of shapes and styles of palette knives. You can use them in many ways. It’s fun to have a variety and see what you can do with them:
Things to try:
- Alternative to a brush for covering a canvas: uses less water because they can be wiped clean.
- Directly moving paint around on a painting and creating special effects
- Covering edges without a brush
- Stimulating cells when dipped in silicon oil
Waterworks
Water affects pour paintings in interesting ways. You can add water to paint to thin it, which can make it easier to cover a canvas. Thinned paint behaves differently on the canvas because it has a different viscosity. You can also drip thinned paint onto a painting. If drips fall from a few feet (a meter) they droplets explode on the surface of the painting and scatter chaotically. You can also drip water on places where paint meets and sometimes it creates a delta-like effect with tiny fjords & bays.
Things to try:
- Thin paint 1:10 with water and drip from 3′ high (one meter)
- Put a drop of water on the junction of two colors on your painting
- Cover the background with water thinned by adding 20% more water by weight
More reading: http://capturedchaosart.com/blog/files/waterworks.html
Marbles
Marbles roll as you pan a painting and drag paint along with them. You can control where the marble goes by panning, or with magnets.
Things to try:
- Put a marble (or two or three) on a wet painting and roll it around by panning
- Put a steel ball on the painting and manipulate it with a magnet from underneath
- Put a magnetic ball on the painting and manipulate it with a piece of steel from underneath
Salvaging Paint
Paint is a valuable resource, not to be wasted. It essentially is a single-use plastic in paste form. It is easy to assume the paint that rolls off your painting while panning, or paint left over in your cup after a pour, is no longer useful. That isn’t true: there are many uses for paint that has not ended up on your canvas, at least while the paint is still wet.
One key to salvaging paint is to have a container to store it for later use. Wet paint will remain usable for a week in a loosely covered cup, and longer in a tightly covered cup. But, it is best to use salvaged paint as soon as possible.
Uses for Salvaged Paint
Here are some uses for salvaged paint:
- Cover a canvas before a pour, especially if you intend to pan to cover the whole canvas, because the salvaged paint won’t even be visible
- Directly use salvaged paint in a cup for a dirty pour or flip cup pour
- Pour into a cup along with other new paint colors for a dirty pour or flip cup pour
- Capture salvageable paint from your work surface using a broad palette knife and carefully lay it onto a canvas to preserve the pattern already in the paint
- Salvaged paint works as an excellent glue for craft projects
- Dip objects into salvageable paint while it is still on your work surface to transfer the pattern to them
- Use a plastic work surface and peel dried paint off it to use as decals or appliques
Avoiding Wasted Paint
Minimizing waste while painting means less salvageable paint, but also less waste:
- Learn to make better estimates for how much paint to use for a given size of canvas
- Don’t mix too much paint, especially if you don’t store paint between sessions
- Use squeeze bottles with lids to reduce paint drying between sessions
- Squeeze all the paint out of tubes: cut them open with a scissors to remove the last of the paint with a popsicle stick.
Salvaging Canvases
Canvases are a valuable resource, not to be wasted. Pour painting is kind of hit or miss: you probably won’t like all your paintings. It is easy to assume the a painting you don’t like is a waste. That isn’t true: there are many uses for paintings that you don’t like, whether they are still wet or have already dried.
Salvaging Wet Canvases
If you are making a painting and you don’t like how it is going you can change directions and try other techniques. Here are a few ideas you can try while the paint is still wet (e.g. within an hour of pouring):
- Add more paint to cover areas you don’t like, either right from a squirt bottle or using a cup for a pour
- Add more paint on one edge and use a plastic sheet to swipe across the painting
- Press a shipping pillow onto your painting and pull it off to modify the painting wherever you choose
- Scrape the paint off into a cup and use it in a different painting
Salvaging Dry Canvases
If a painting has dried and you don’t like the result, you can reuse the canvas for another painting. There are some limitations. You can’t cover a really dark canvas with light, transparent colors without seeing the dark colors variously throughout your painting. And, dried paint often has a texture, especially if it was thick. The texture of the paint interferes with even flow of the new paint you add and even if you cover it all you will still see some of the texture from the painting below. In addition, high points in the original painting might poke through and appear in the new painting.
Aside from using it for a new painting, there are lots of ways to use a dry canvas for arts and crafts:
- Cut the canvas from its frame and cut shapes out of it, capturing areas of the painting you do like
- Use cut sections of canvas as decals or appliques
- Use cut sections of canvas as gift cards (you can write on the back of the canvas)
Subjective Balances
There isn’t a right way or wrong way to make your paintings. Probably no matter what you do you will like some of your paintings and not others. Also, other people won’t agree with you: they’ll like ones you don’t and won’t like ones you do. Beauty is subjective. So is balance. There are different kinds of balance to consider, and gleefully ignore (or not).
Detail Balance
There are lots of details in your paintings:
- Big cells you stimulate or that appear naturally
- Tiny cells from spraying oil droplets with a toothbrush (for example)
- Areas covered with mingling and partially blending colors
- Palette knife effects
- Dutch pour effects
- The results of panning
You have some control over where these details appear and how much of the canvas has each kind of detail. You might not have total control, but you can affect the painting with your choices. The balance of these details is up to you: how much of the painting should have any one detail and how much of the canvas should have any details at all.
A painting with negative space (where the canvas or background color on the canvas isn’t fully covered) has a detail balance where some of the painting has no details and some does. Compared with a similar painting with no negative space the difference is undeniable.
A painting with entirely tiny cells is very different from one with a few big cells here a some tiny cells over there, or one with no tiny cells at all, or one with no cells at all.
There isn’t a right answer for balance, but understanding that these balances exist give you a framework to try new things and explore ways to make your paintings more interesting to you.
Things to try:
- Make a painting with negative space
- Make a painting where the size of the cells generally increases from bottom to top
- Make a painting where the number of colors present increases from one side to the other
Color Balance
There are a few different kinds of color balance you can consider and gleefully ignore (or not). There is no right or wrong colors to use in your paintings, but colors have intrinsic relationships to each other and the balance in those relationships have an affect on how paintings are perceived.
Colors near each other on the color wheel have very little conflict. Colors farther away have increasing levels of conflict. Colors exactly opposite each other on the color wheel have the largest amount of conflict. Conflict is also contrast, but it is more than just that. Color conflict has an effect on the viewer, which of course is different for everyone. Not everyone likes orange and green next to each other in a painting, or yellow and blue. The colors conflict. You can feel the difference when you look at a collection of greens near each other and compare them to a collection of yellow, reds and blues near each other.
Color conflict is a tool you can use to explore the color wheel and perhaps make your paintings more interesting to you.
Things to try:
- Swipe with a color that conflicts with all the other colors on a painting (e.g. filled zones with greens and blues and swipe with orange).
- Make a painting with minimal color conflict
- Make a painting where the colors next to each other don’t conflict much but the progression of colors has conflict between one side of the painting and the other
Advanced Pour Techniques
Kiss Pour
A kiss pour is the name given to the technique of putting different colors of paint into two cups and then pouring them onto the canvas at the same time, letting the two streams of falling paint interact with each other before landing on the canvas.
The interaction doesn’t blend the paints. Instead it generates lots of fine details. This works best with contrasting colors and colors with a lot of conflict, because the details of their interactions are more visible. These details can be extremely fine. If the colors are too similar the details will be hard to see.
It takes some practice. You can move the cups around your canvas to let the paint fall where you want, or you can release the paint in a line or curve across your canvas. If the streams come apart it is like two simultaneous dirty cup pours.
Essential technique:
- Choose Colors
- Prepare canvas – cover entire canvas
- Fill two cups part way with colors, optionally adding a drop of oil occasionally to one or both cups
- Pour to mix streams over empty space in middle
- Pan to cover empty canvas and invade corners
Options to explore:
- Prepare canvas with two colors that meet along some curve you like and kiss pour along that curve
- Press clean side of an air pillow into painting and pull it away, possibly twisting as you do
- Stimulate cells with oil and a palette knife
- Spray oil on painting to make cells
- Place marble on painting and pan to roll it around in the paint Pour
Clean Pour
A clean pour is the name given to the technique of putting different colors of paint directly onto the canvas without using any kind of cup.
Essential Technique:
- Choose Colors
- Prepare canvas – cover entire canvas
- Pour individual colors right from the squeeze bottle or mixing cup
- Optional: add lines of another color to separate the individual pours
- Pan to cover empty canvas and get colors to touch each other
Options to explore:
- Prepare canvas with multiple colors that meet along some curves you like and clean pour in the middle of each colored region
- Press clean side of an air pillow into painting and pull it away, possibly twisting as you do
- Stimulate cells with oil and a palette knife
- Spray oil on painting to make cells
- Place marble on painting and pan to roll it around in the paint Pour
Palette Knife Work
Palette knives come in many shapes. You can explore these to see what you can do with them. Some are offset from the handle so you can hold the handle above the painting while the entire palette knife can lay flat in the paint. Others have no offset and you can’t use their side on your painting, just the edges. So, not every knife is idea for every technique. It’s fun to have a variety to to see what you can do with them. Remember: if you don’t like the result, add more paint and try something else.
Palette Knife as a Brush
You can use a palette knife as a kind of brush to manipulate the paint. One advantage of this is that you can wipe your palette knife clean instead of washing it in water (which saves water at the expense of using a small piece of paper towel or newspaper.).
Essential Techniques:
- Cover a canvas with a palette knife instead of a brush (works best with opaque colors)
- Drag a palette knife through wet paint to smear it around or create spikes or even leaf shapes
- Use a palette knife to collect paint that has dripped off your canvas and apply it to the edges of your painting
- Dip a palette knife in a drop of oil and touch your painting wherever you want cells. This is especially fun with the weird palette knives with lots if tiny fingers at their end, like a comb or fan.
- Press a palette knife into a wet painting and pull it up, as if it were a tiny air pillow
Using a Palette Knife with Salvaged Paint
You can use a broad, flat palette knife to carefully collect paint from your work surface and transfer it directly onto another canvas. You slide the knife under the paint, hopefully preserving the pattern on top. Then you carefully slide the bottom of the knife across the new canvas, at an angle so the the paint slides back off the knife. Keep the leading edge of the knife up and the back edge dragging on the canvas. Keep the knife moving until most of the paint has slid off. If going back to the same puddle to collect paint you don’t need to wipe the knife clean. If you’ll collect other colors from other puddles it might be helpful to wipe the paint from the knife to keep the colors apart (or not).
Work your way around the outside of the canvas laying down one knife after another. The patterns you lay down can be bigger than the size of the knife if you stretch the paint out while laying it down. You control how much it gets stretched out to some degree. Work your way around the canvas until you either run out of salvageable paint or reach your starting point. This will leave an uncovered portion of canvas in the middle with very rough edges. This is your starting point for almost any kind of painting.
Things to try:
- Make a clean pour into the void in the middle and use a sharp palette knife to coax the paint to exactly meet but not overrun the rough edge of the salvaged paint you laid down around the void.
- Make a dirty pour into the void in the middle and pan until it reaches the rough edges
- Make a kiss pour around the outside edge of the void and pan to ensure the middle is covered
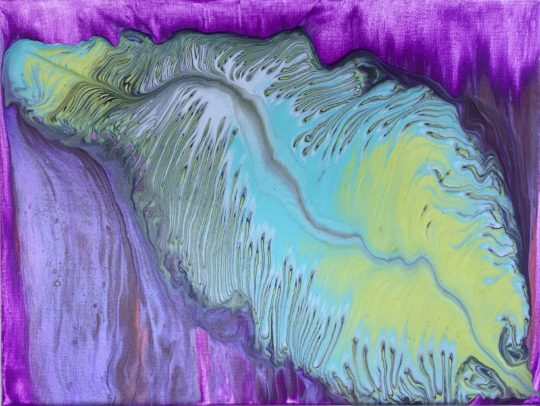
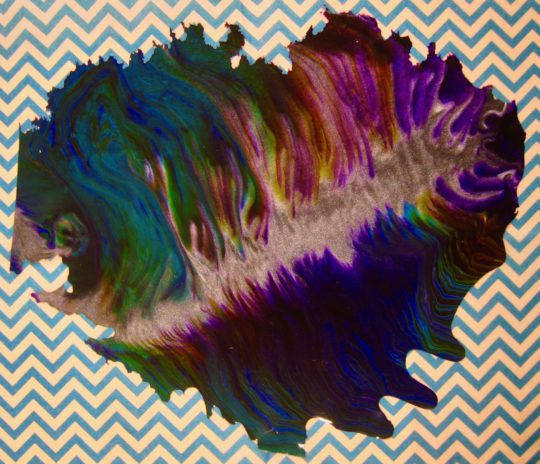
- After a clean pour in the middle, repeatedly drag the palette knife from the middle out into the salvaged paint. These radiate out from the solid color every few degrees, looking something like a sea urchin with points in all directions.
- After a clean pour in the middle, repeatedly drag the palette knife from the salvaged paint into the solid color in the middle. These radiate in from the salvaged paint every few degrees, looking something like the image above.
- Try storing the painting at a slight angle while it is drying so the painting skews toward one side
Skins
One alternative to painting on canvas is to use pour painting techniques on plastic sheeting, and then separate the skin when it is dry. It is usually easier to peel the plastic sheeting off of the skin than vice versa.
Canvases often come in shrink-wrap to protect them. You can pour paint right onto the shrink-wrap.
Then you can use the canvas for a regular pour painting after the shrink-wrap is removed as part of peeling the skin. You can also pour onto other kinds of plastic sheeting, but test them first to ensure the paint doesn’t adhere too strongly. For example, you cannot make skins on paper or cardboard because you cannot separate them.
Skins allow you to see both sides of the painting. You see the top of every painting you make, but the bottom part that touches the canvas is always invisible unless there is no canvas at all or unless you paint on glass or plastic sheets.
Skins can be cut with a knife or scissors. They’re flexible and can stretch a little, so they can be glued onto curved objects. They bend tightly enough to cover a pencil. So, you can make a skin, pick your favorite parts of it and cut shapes from the skin. Then you can glue those shapes onto other things. They’ll stick to glass without glue, just by squeezing out the air between the skin and the glass air pressure holds the skin in place.
Skins take longer to dry because the water in the paint can’t evaporate through the underside of the canvas. It can take a week or longer for a skin to dry, especially larger skins which tend also to be thicker because the weight of the paint stretches the plastic and canvas in the middle causing pooling. The center of a big skin could be twice or more as thick as the edges.
One of the nice things about skins is that it allows you to apply your pour painting art to other objects. Of course you could probably pour paint right on those objects, but skins allow you much more control:
- You can choose a portion of skin you like, instead of hoping that you will like a pour on an object
- You can exactly control which areas of an object have a skin on them, so liquid paint doesn’t get where you don’t want it
- You can keep all liquid paint away from objects by working with skins
- You can use templates to cut identical shapes from a skin (such as corners for mirror, or hearts)
Essential Technique:
- Don’t unwrap a canvas – leave the plastic sheeting on it
- Add push pins in the bottom corners as usual
- Make a pour painting as usual
- Wait until the painting is completely dry – up to a week or more
- Carefully cut the plastic along the outside edges of the painting and remove the skin and the plastic it is on
- On a clean towel lay the skin down with the plastic side up
- Peel the plastic back along the skin to separate them – use a hobby knife to separate the two where they don’t come apart easily
- Store the skin in a cool, dry place between sheets of smooth tissue paper
- Cut the skin to shape and glue or apply to objects
Things to try:
- Make a skin and cut hearts out from it. Apply them to a valentines day card.
- Fold a small paper square diagonally in half and cut a pattern in one edge. When unfolded the pattern will be symmetrical. Use it as a template to cut four of the same shape from a skin and place them in the corners of a mirror
- Glue a skin to a pen
- Apply a raw skin to a window (the colors will fade over time, alas)
More reading: http://capturedchaosart.com/blog/files/skins.html