
Asset Number: AMT462
Description: Makita Miter Saw
Status: UP
Location: Workshop
Certification Required: No
Last Updated: 2026-10-10 23:24:47
Make/Model: Makita 12 In. Dual-Bevel Sliding Compound Miter Saw, LS1219L
Documentation: Manual
Video Overview of Controls: Video
Overview
- This saw will make 15” crosscuts at 90 degrees.
- It miters 0° to 60° left and right, with positive stops at 0°, 15°, 22.5°, 31.6°, 45° and 60° (left or right).
- The bevel Lock is located in the front of the saw for easy access and Quick adjustments from 0° to 48° (left and right)
- The saw is powered by a 15 amp direct drive motor with soft start.
- Has an electric brake
- Has an electronic speed control maintains constant speed under load.
- See-through blade guard for greater visibility of the blade and line-of-cut.
- Has a built-in laser to indicate the line-of-cut whether the blade is turning or not
- Has dual dust Collection ports for improved dust Collection capability
- Has a large-sized aluminum base that improves the stability of cutting stock for more efficient cutting.
Quick Terms
- Bevel
An angle of the saw other than 90 degrees, tilted to either side, as if you touched your ear to your shoulder. The bevel angle can be read on a scale that is near the back of the saw on the joint that connects the saw to base.
- Miter
An angle of the saw other than 90 degrees, twisted to either side, as if you touched your chin to your shoulder. The large scale on the front of the saw shows you the current miter angle at the small orange arrows.
- Saw / Blade Recess
The area in the Saw’s base where the blade dips into, providing a thru-cut of material
- Preset Release
A button or lever that turns off or on the preset stops, either for the miter or bevel scale. When turned off, all angles are reached without any stops. When turned on the saw stops at preset angles. When preset angles are enabled, you must momentarily activate the Preset Release to move the saw away from any preset angle.
Securing Stock
While it is safe to hold your stock more than 4″ from the blade, the saw also has a stock hold-down clamp that is quick and easy to use.
Place the knurled end of the hold down into the receiving hole on either side of the saw. The mid section can be tightened and loosened separately, to help you position the clamp at the right height and close enough to the saw. The clamping screw has a wide range of adjustment. Tightening it causes the knurled end to bind in its mounting hole, to hold the stock securely.
Simply loosen the clamping screw and the knurled end moves freely, quickly releasing your stock for the next cut.
Making a Cut
- Set any required Miter and Bevel angle
- Position your stock so the blade will cut it where you want it to be cut
- Secure the stock with the hold-down clamp
- Before you turn the saw on, pull the saw toward you, past your stock, while it is still above the stock
- To activate the saw, press the button on the handle while pulling the trigger.
- Wait for the saw to reach its operating speed
- Lower the saw until it reaches its maximum depth and then move the saw slowly away from you
- Raise the saw above your stock and then release the trigger so it stops
Adjusting the Miter Angle
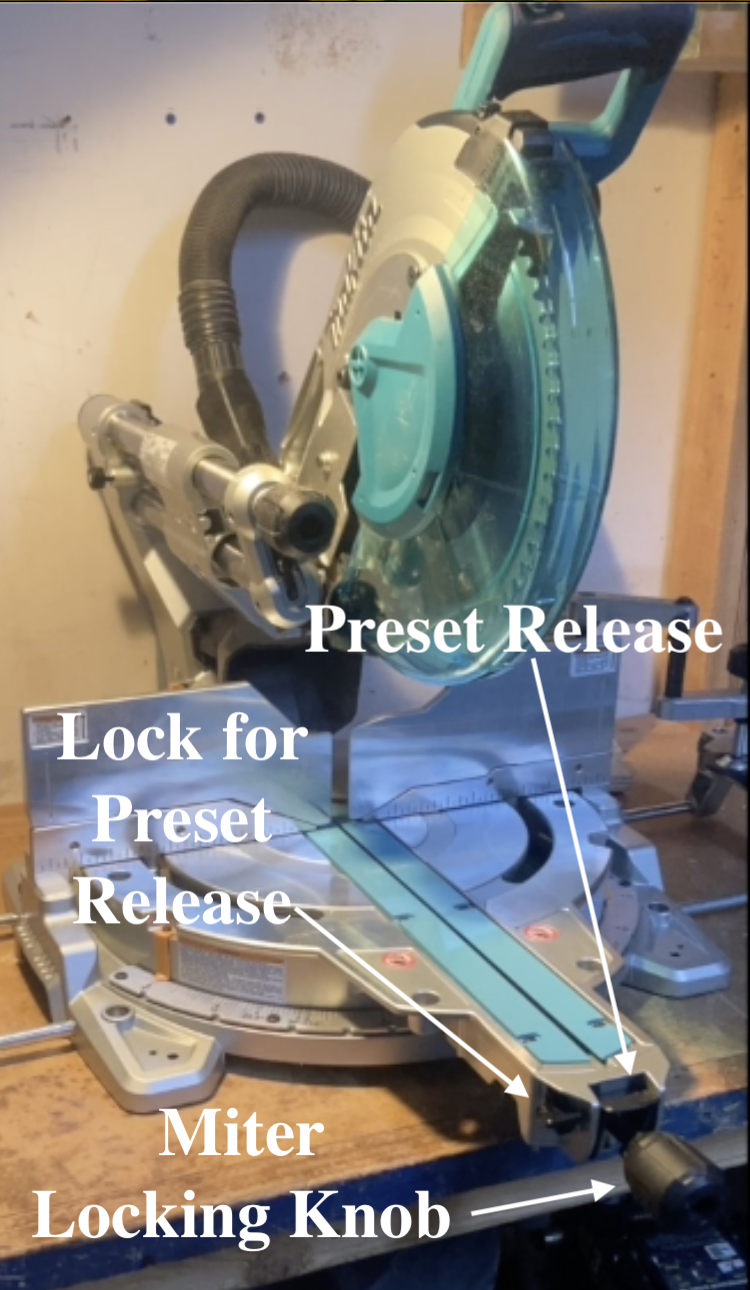
To adjust the miter angle:
- Unlock the miter adjustment by twisting the Miter Locking Knob counter-clockwise a couple times, until the saw moves easily left and right
- Move the saw left or right until you have set the angle you want.
- The saw will stop at preset angles unless you keep the Preset Release button pressed, or unless you press the Lock for Preset Release button to its left.
- You can use the laser to see about where the saw blade will cut: the laser line is about 0.4″ left of the cut line.
- When you have set the angle you want, turn the Miter Locking Knob clockwise until it is snug. That prevents the angle from changing during the cut.
Adjusting the Bevel Angle to the Left
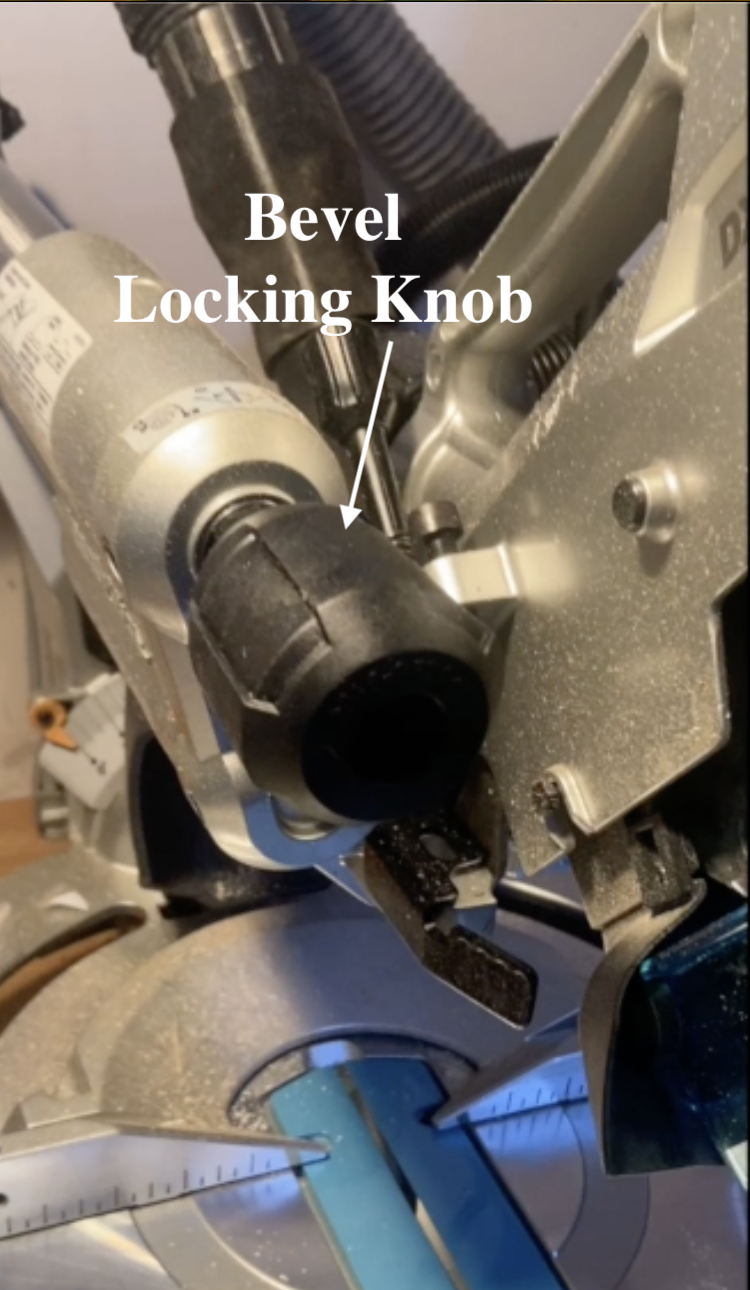
To adjust the bevel angle to the left:
- Unlock the bevel adjustment by twisting the Bevel Locking Knob counter-clockwise a couple times, until the saw moves easily to the left.
- Move the saw left until you have set the angle you want.
- The saw will stop at preset angles unless you pull the Preset Release out (toward the front of the saw), or unless you hook it over the the holder to its left to keep it released.
- You can reach an angle up to 48º if you pull the 45º Release control toward you.
- You can use the laser to see about where the saw blade will cut: the laser line is about 0.4″ left of the cut line.
- When you have set the angle you want, turn the Bevel Locking Knob clockwise until it is snug. That prevents the angle from changing during the cut.
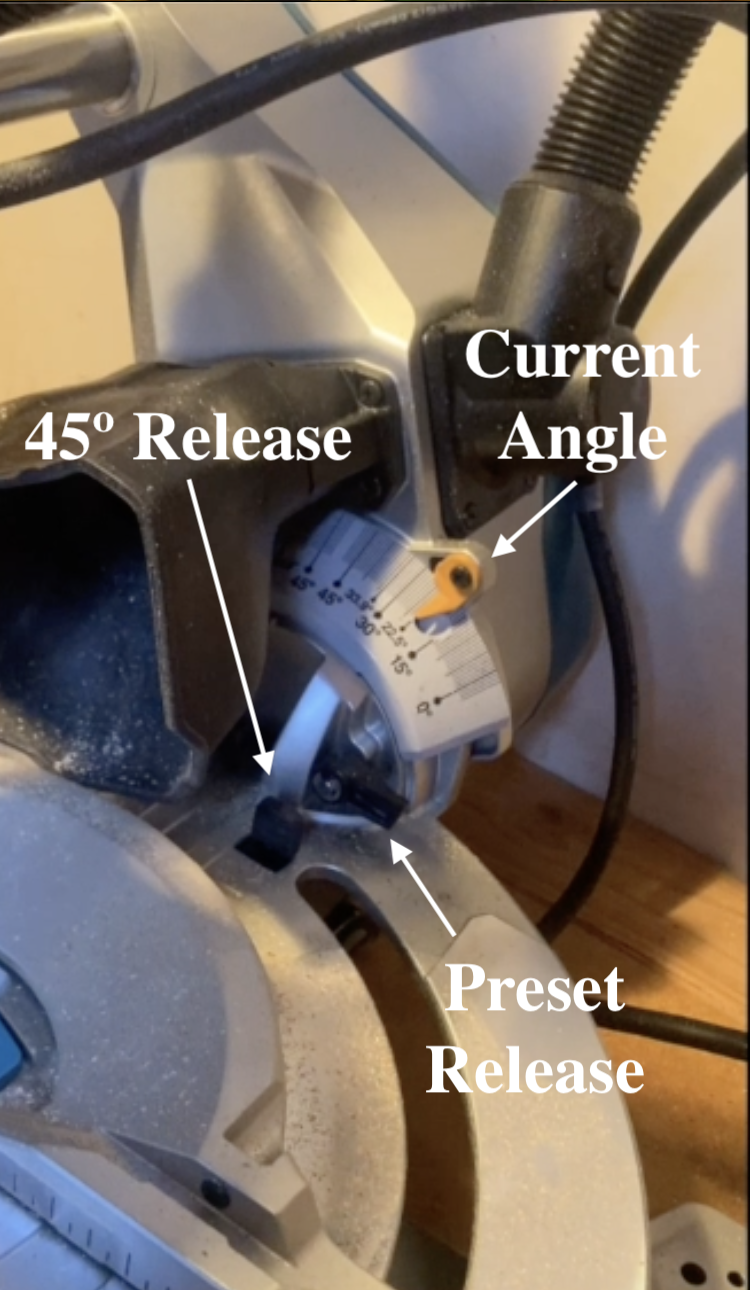
Adjusting the Bevel Angle to the Right
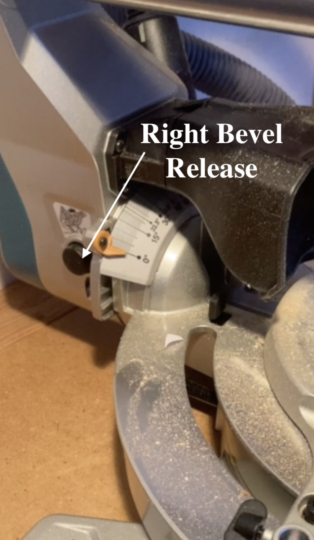
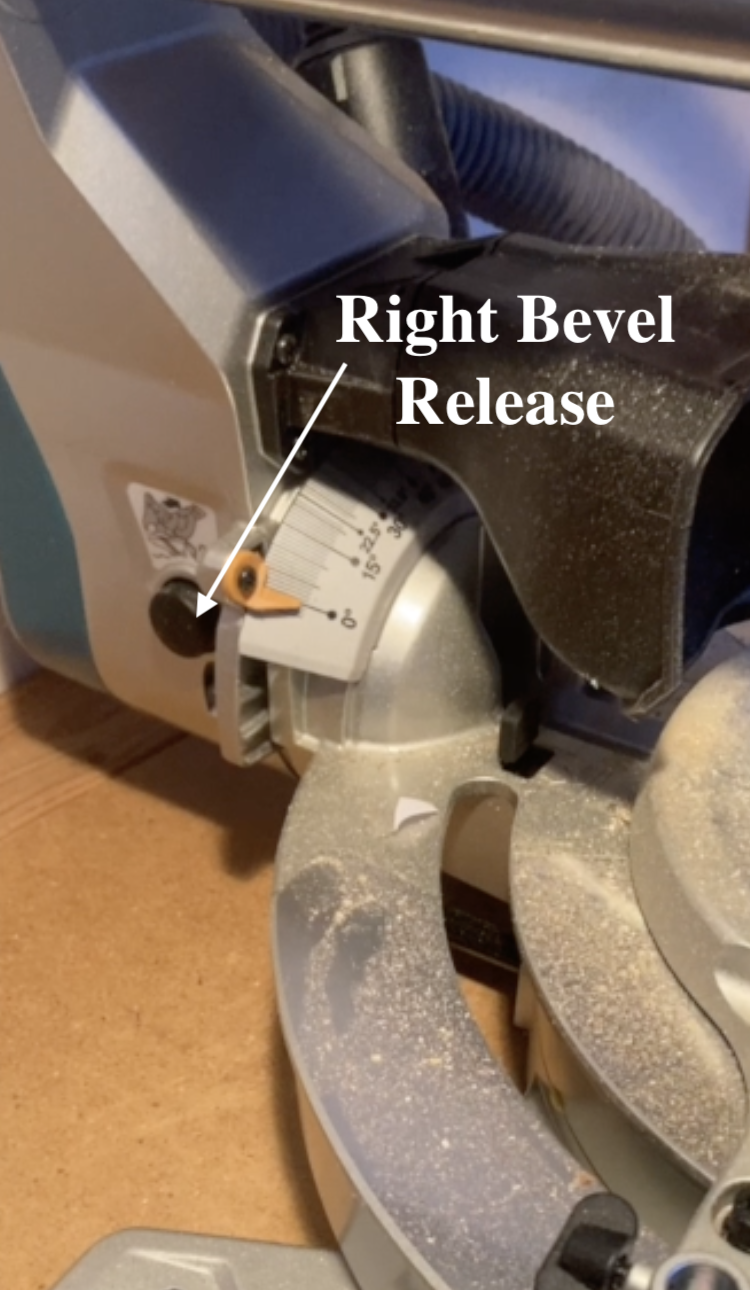
To adjust the bevel angle to the right (see photos in previous section):
- Unlock the bevel adjustment by twisting the Bevel Locking Knob counter-clockwise a couple times, until the saw moves easily to the left.
- Press the Right Bevel Release button and move the saw to the right, past 0º.
- Move the saw right until you have set the angle you want.
- The saw will stop at preset angles unless you pull the Preset Release out (toward the front of the saw), or unless you hook it over the the holder to its left to keep it released.
- You can reach an angle up to 48º if you pull the 45º Release control toward you.
- You can use the laser to see about where the saw blade will cut: the laser line is about 0.4″ left of the cut line.
- When you have set the angle you want, turn the Bevel Locking Knob clockwise until it is snug. That prevents the angle from changing during the cut.
Depth Of Cut Control
Setting the depth of cut control for the saw is on the left of the saw, near the blade’s axel. There is a long black knob to adjust the depth of cut. There is also a enable/disable sliding control that allows you to turn the depth of cut control off without losing its setting.
[picture callout pending]
Locking the Saw
We don’t usually lock the saw, but both the slide function and raising and lowering the saw can be locked.
Slide Lock
There is a small button that can be pulled out and rotated 90º to lock the sliding mechanism.
Blade Raise Lock
There is a small button that can be pulled out and rotated 90º to lock the saw so it cannot be raised up.
Base Extensions
On either side of the saw there is a retractable support for the base.
Maintenance
Annual
Monthly
- No status record was found for this asset.
Last Updated: 2026-10-10 23:24:47